In red teaming engagements, simply finding an XSS or basic misconfiguration often isn’t enough, achieving RCE is the real deal. During one such assessment, we came across XiongMai’s uc-httpd, a lightweight web server used in countless IP cameras worldwide. According to Shodan, roughly 70k instances of this software are publicly exposed on the internet. Despite its history of severe vulnerabilities, no readily available exploit seemed to provide code execution, so I set out to build one.
The original plan was to target CVE-2018-100881, a buffer overflow vulnerability for which an existing exploit2 only crashes the server but does not gain RCE. But as with most of these journeys, there’s rarely a straight path, and more often than not, adaptation is key. So along the way, I discovered new paths, learned about the ARM architecture, and built a ROP chain that was delivered via a web request and reused the same connection as a shell. Who needs a reverse shell anyway? But let’s start at the beginning of the story.
Analysis
Before anything can be exploited we need an understanding of the vulnerability. So, first and foremost, I needed to obtain either the source code or a compiled binary of uc-http. Unsurprisingly, this software is not open source. But much to my convenience there is CVE-2017-75773, a very trivial path traversal vulnerability, which allows to download arbitrary files from an affected uc-http server. Via /proc/self/exe the currently running executable - usually the file is called Sofia - can be downloaded for analysis.
I went ahead with the usual inspection of the target binary utilizing file and checksec4. As we can see below it’s an ARM 32bit dynamically linked executable.
| |
| |
There is no Relocation Read-Only (RELRO), meaning the Global Offset Table (GOT) is writable, no stack canary to detect stack overflows, and no-execute (NX) is disabled, allowing execution of shellcode on the stack. Also, since it isn’t a position-independent executable (PIE), the binary is always loaded at a fixed address.
I fired up Ghidra to decompile the binary and explore its inner workings. By cross-referencing the log output of the binary, when triggering the existing exploit, with strings found in the binary, I was able to pinpoint a function that appeared to act as an HTTP dispatcher (more on the exact debugging environment later).
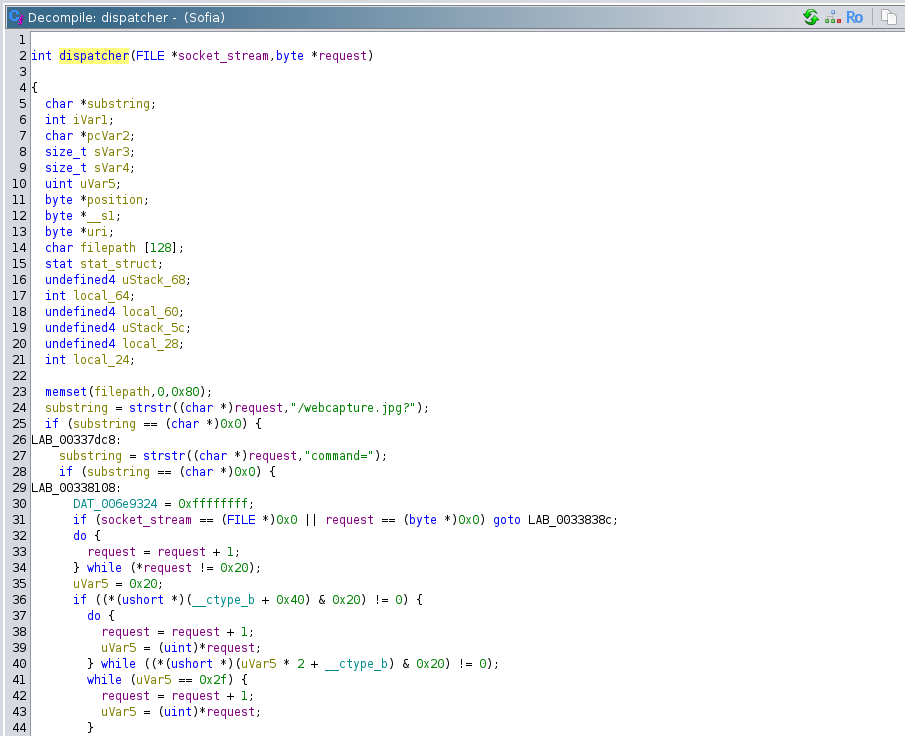
Decompiled HTTP dispatcher of Sofia binary.
In this function CVE-2018-100881 was fairly simple to spot. The usual suspect strcpy was used to copy username and password parameters from an http request’s body into some data segments.
| |
By inspecting said data segments I found that these buffers have a length of 20 bytes each. Therefore usernames and passwords that exceed a length of 20 characters cause the respective buffers to overflow. I also found that these buffers are located within the binary’s .bss data segment which is certainly not ideal for hijacking the program’s execution. I noticed though, that there are some function pointers further down in that segment that could be overwritten using this overflow which, in theory, could allow redirecting execution.
However, after skimming through the rest of the dispatcher function I found another vulnerability (CVE-2022-45460 as I found out much later) which seemed much more promising for what I had in mind. Let’s have a look at it.
| |
The excerpt shows that URIs and file paths are concatenated using sprintf, once again without any bounds checking. Particularly interesting is the branch where the user-controlled URI is concatenated with the string /usr/mobile. In this case the overflow happens on a stack variable I called filepath. Overflows on the stack are powerful because typically function return addresses are stored on the stack, making it possible to overwrite them during an overflow and redirect the program’s execution. And since there are no stack canaries in place to hinder exploitation, this should be relatively straightforward to exploit.
Debugging Setup
Before diving into experiments with the vulnerability, I wanted to set up a dedicated testing environment for debugging. My goal with this was to avoid relying on any hardware device. Without the use of any existing exploit I also didn’t have access to the device to deploy a debugger.
So I began with dumping the filesystem using the path traversal vulnerability3 as mentioned before. I then experimented with chroot and QEMU’s ARM System emulator5 to have a purely virtualized environment. This worked quite well for a while but eventually exhibited seemingly weird behavior particularly in terms of memory addressing.
I still had a Raspberry Pi lying around, so I figured I’d give that one a try. I copied the gathered rootfs to the Pi and grabbed static gdbserver6 and bash (required by gdb) binaries. I then started up gdbserver inside the chroot on the Pi.
| |
Then I connected to it from my machine using gdb-multiarch.
| |
So the final setup looked roughly like this7 8:
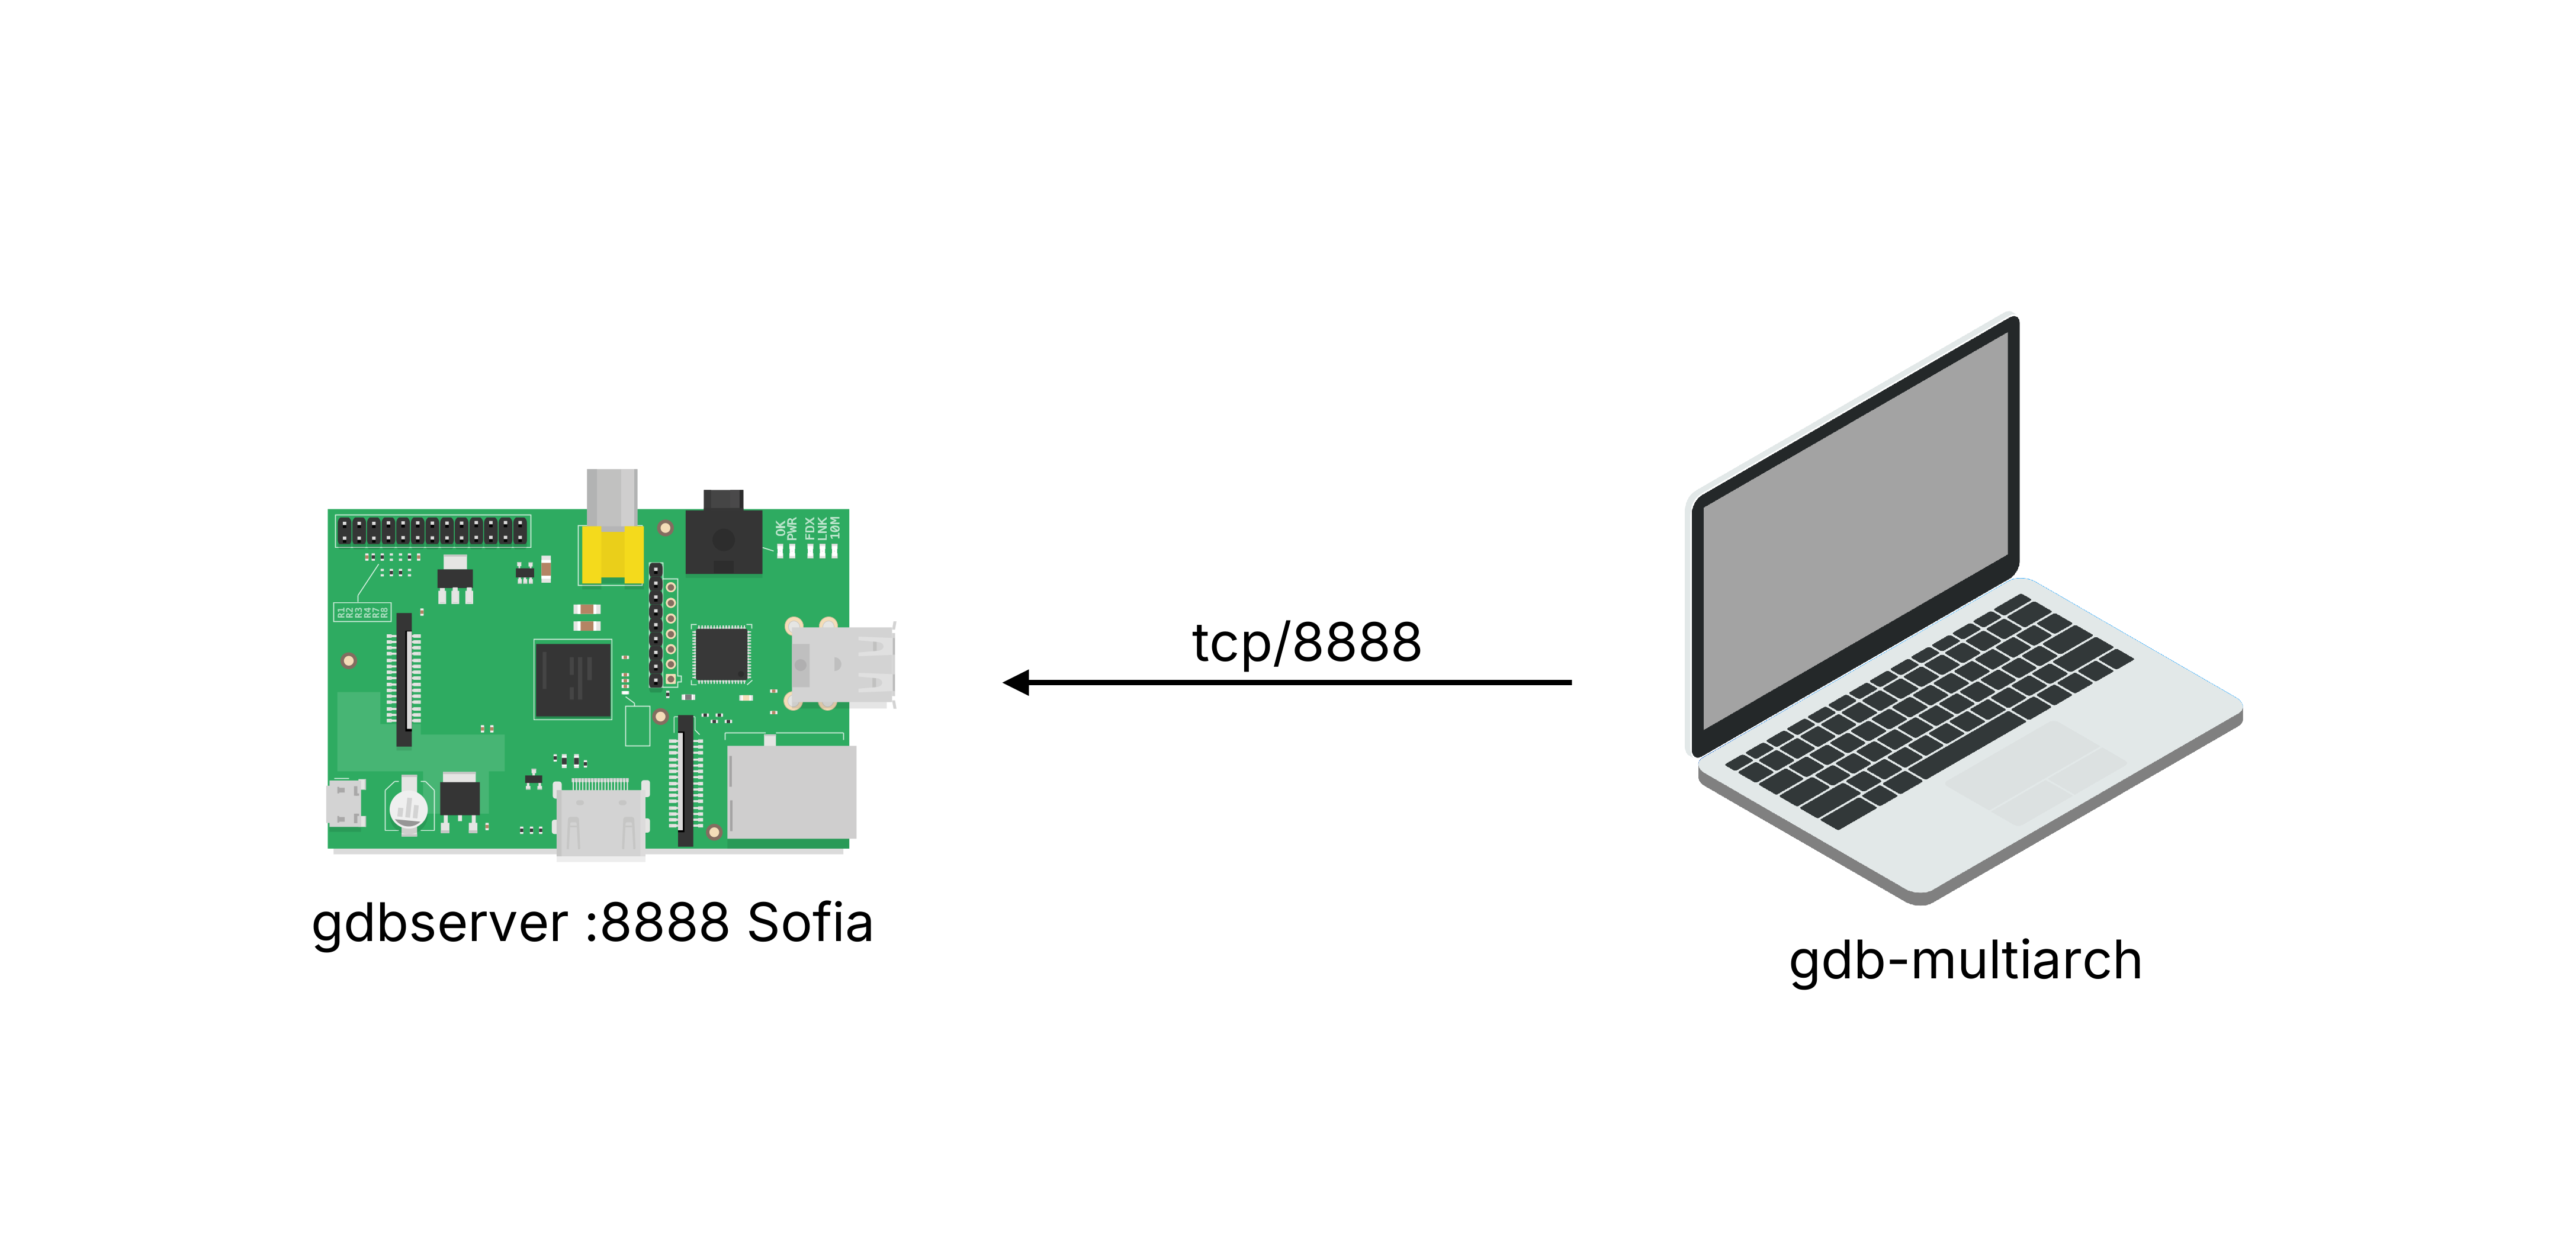
Raspberry Pi debugging setup with GDB-Server and GEF-client.
This setup allowed to use GEF9 on the attacker’s machine to set breakpoints and debug the target on the Pi remotely. Perfect.
Triggering the Vulnerability
With the described setup in place a first attempt could be made to trigger the identified vulnerability. This process was no different than with any pwn binary exploitation challenge of this type. To take control of execution, we first need to determine where our input overwrites a specific offset on the stack that eventually gets popped into the program counter (PC). By sending a unique pattern and observing which bytes end up in the PC when the program crashes, we can pinpoint the exact offset. The only thing to keep in mind was to always end the URI with .mns.cab to ensure the correct code path was being hit.
| |
To observe what was happening server-side, I placed a breakpoint at the return statement following the vulnerable section, right after the second call to fwrite. As shown below, registers r4 to r10 are popped from the stack, followed by PC. With the Python script above, these registers were filled with the character A, while PC was set to BBBB, marking the entry point for the control flow hijacking.
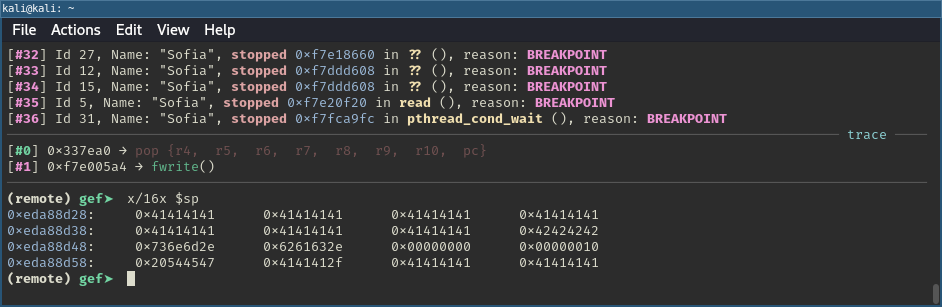
Triggering the buffer overflow vulnerability.
Building the Exploit
At this point there are a few things to mention. Although NX was disabled, meaning there should have been an executable stack, I wasn’t really sure about this. Within my Raspberry Pi setup the stack was always marked as rw as opposed to rwx. Attempts of executing shellcode from the stack failed. I therefore (incorrectly) assumed that this would be the same on a real device. I didn’t spend much more thought about it and continued with the plan to build a ROP chain instead.
A ROP (Return-Oriented Programming) chain is a technique used in exploitation where an attacker leverages small code snippets, or gadgets, already present in a program’s memory. By chaining these gadgets together, they can execute arbitrary code without injecting anything new.
Also, although PIE was disabled for the Sofia binary itself, the included libraries had PIE enabled and I was therefore also assuming that ASLR was enabled. When building a ROP chain this means that an ASLR bypass is needed in order to use gadgets from included libraries such as libc.
Another important thing to keep in mind is that, since we’re using sprintf for the overflow, the payload cannot contain null bytes, or it will be truncated. Additionally, after inspecting the decompiled section further, I found that spaces are stripped as well.
ASLR Bypass
Because PIE is not enabled on the Sofia binary, it will always be loaded into the same memory region, even if ASLR is enabled. However, since the binary is mapped within a region that only spans the lower 3 bytes of the address space, every address contains a null byte in its most significant byte. This means that, at least for the entry point of the ROP chain, gadgets from the Sofia binary itself can’t be used. I therefore focused on the included libc, but since libc was compiled with PIE, bypassing ASLR became essential.
As you might have guessed, our path traversal vulnerability came to the rescue once again, this time to bypass ASLR. There is really no magic to it other than dumping /proc/self/maps to retrieve the memory mapping of the Sofia process thus allowing to determine base addresses of all included libraries.
ARM Architecture
Since building a ROP chain requires an understanding of the underlying architecture, we first have to cover some very basic concepts about the ARM architecture. If you’re already familiar with this, feel free to skip this part.
ARM is a RISC architecture, meaning it uses a smaller set of simple instructions compared to complex ones like x86. It’s widely used in mobile devices and embedded systems.
A unique aspect of ARM is the Thumb instruction set. Thumb is a subset of the most commonly used 32-bit ARM instructions, with each instruction being just 16 bits long. These instructions have the same effect as their 32-bit counterparts but allow for more compact, efficient code. ARM processors can switch between ARM and Thumb modes during execution10.
For ROP chains, ARM’s calling convention11 is particularly important, as it dictates how function arguments are passed and how control flow is managed. ARM has 16 general-purpose registers, from R0 to R15. Registers R0-R3 are used for passing the first four function arguments, and if a function has more than four arguments, the rest are placed on the stack. R4-R11 are used for storing local variables within a function. Return values from functions are stored in R0-R3.
When it comes to jumps in ARM, there are four main types: B, BL, BX, and BLX. These instructions control program flow and differ in their ability to save the return address or switch between ARM and Thumb modes. The table below summarizes their properties12:
| Instruction | Functionality | Saves Return Address (LR) | Can Switch Instruction Set? |
|---|---|---|---|
| B | Simple branch | No | No |
| BL | Branch with Link | Yes | No |
| BX | Branch and exchange instruction set | No | Yes (depending on destination) |
| BLX | Branch with Link and exchange instruction set | Yes | Yes (depending on destination) |
When the return address is saved, it means that the address of the next instruction after the branch is stored in the Link Register (LR). This allows the program to return to this point after the branch or function call is complete. As we will see later, this is reflected in function prologues and epilogues. In a function’s prologue, the LR register is typically pushed to the stack to preserve the return address, and in the epilogue, it is popped back into PC to ensure the program jumps back to the calling function.
Hunting for Gadgets
Let’s talk about building the ROP chain. At the end of the day, this process is all about finding useful gadgets that work together to achieve a specific goal. For my first attempt, I set out to build a chain that executes system("/bin/sh").
For this to work I needed gadgets that would move the stack pointer into R0 (since R0 is where the first argument is passed) and then jump to the system function contained in the loaded libc. This way, I could use the stack to place the command I wanted to execute.
To find these gadgets, the widely used tool Ropper13 is very handy. It’s designed for identifying and extracting ROP gadgets from binaries.
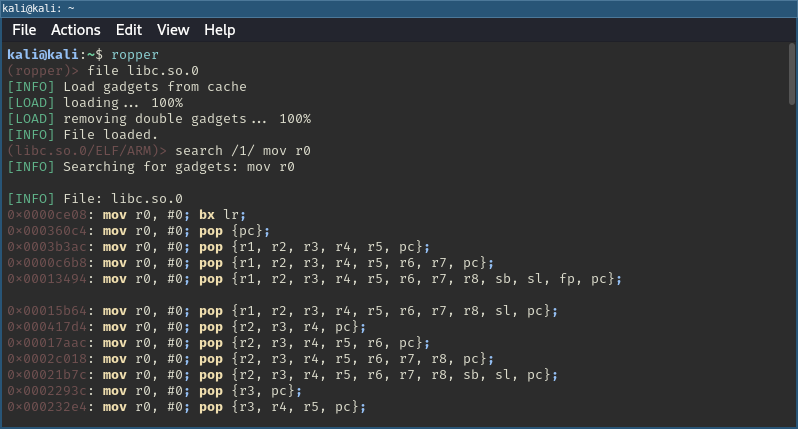
Hunting for gadgets using Ropper.
After searching for a while I came up with the following solution:
| |
The first gadget sets R3 to a controlled value and jumps to the next address. The second gadget (mov r0, sp; blx r3) moves the stack pointer into R0 (the first argument for system) and branches to R3, which we previously set to the address of system.
Function addresses, such as the one for system, can be determined using readelf -s. However, it’s important to remember that we’ll need to add the base address of the respective binary or library to the offsets you see in the output. This ensures we’re working with the correct addresses when constructing the ROP chain.
| |
As we learned earlier, the payload cannot contain any spaces. However, I found that this can easily be bypassed using the well-known ${IFS} tactic14.
Putting everything together I came up with an exploit roughly looking like the following (full source available here):
| |
Since /bin/sh as a command wasn’t very useful without a way to interact with it remotely, I used telnetd to start a local telnet server on port 1337. This allowed me to connect and get a shell.

Simple exploit with shell via telnetd.
Yay, RCE! But ever since analyzing the decompiled dispatcher function, another possible solution had been stuck in my mind. I kept wondering if it was actually possible. Time to find out - off to Part 2.
Part 2 - Taking it a Step Further
Let’s rewind a bit and recall the code section where control flow is transferred to our choosing because of the buffer overflow. We can see that shortly before the return statement there are two fwrite calls writing the response to the socket_stream of the connection to the client which sent the original request.
This led me to the following two assumptions:
- The connection isn’t closed yet when the ROP chain is triggered
- A reference to
socket_streamis very likely still lying around in one of the registers
| |
This reminded me of CTF challenges where the vulnerable binary is exposed over a socket, often using socat. In these cases, a common approach when crafting shellcode to achieve RCE is the following15:
| |
The socket() function creates a new socket using the specified domain, type, and protocol. connect() then establishes a connection to the target address. Once connected, dup2() is used three times to redirect the socket file descriptor to standard input (STDIN), standard output (STDOUT), and standard error (STDERR), effectively binding the shell’s I/O to the socket. Finally, execve() executes /bin/sh, spawning a shell that communicates over the established connection.
In the situation as described above, I was already half way done with this strategy. I already had a socket/connection so anything left to do were the dup2 calls and the call to system, right? This would allow me to reuse the connection already established as a shell.
Since I had a FILE *stream but needed an integer file descriptor for dup2, an extra step was required though - a call to fileno() to retrieve the corresponding file descriptor. So this made the plan look roughly like the following.
| |
However, before jumping into building the ROP chain, I wanted to verify the assumptions I had made earlier. To do this, I set a breakpoint before the second fwrite call and another at the return statement. When hitting the first breakpoint, a reference to socket_stream should be in R3 (the 4th argument of fwrite).
Printing R3 register in GDB before fwrite call.
At the second breakpoint, we can see that the same value is still in R3, which confirms that we indeed have a reference to socket_stream available when the ROP chain is triggered.
Printing R3 register in GDB before ROP chain is triggered.
During this process, I also noticed that the curl command I had issued to trigger the breakpoints hadn’t returned while the program was stopped. This meant that the connection was still open. Great news, the assumptions seemed to hold.
Next step, ROP chain. I continued with searching for gadgets that would move arguments into the correct registers and call the functions as outlined before. I assumed that every function called would return using pop {pc} and therefore I wouldn’t need to worry about the chaining of gadgets and function calls. I was wrong, at least partly.
While the pop {pc} assumption was true I still couldn’t simply chain the calls. Why? Because I forgot about function prologues. As we can see below in the function prologue of fileno for example the registers R4-R8 are pushed to the stack. This makes sure the registers can be restored upon function return (callee-save registers). But we can also see that the Link Register (LR) is pushed to the stack as well.
Inspecting fileno's disassembled function prologue.
With the knowledge of the different jump instructions discussed earlier, this also makes perfect sense. Functions are called using the bl instruction, which sets LR to the address of the instruction immediately following the jump. This ensures that upon exit of a function we’re returning back to the correct location.
However, for my pursuit of building a ROP chain, this sounded like bad news because I didn’t really have control over the LR register. I continued searching for gadgets that would allow me to set LR before jumping to a function. Even though the solution might seem obvious to you, it took me a good night’s sleep to finally realize that we could simply skip the prologue. This way I wouldn’t have to worry about the value in LR at all. So I simply added +0x4 to every function symbol. Problem solved.
Inspecting fileno's disassembled function epilogue.
The only requirement was to add some padding onto the stack to account for the function epilogue. In the case of fileno, this meant 5 x 8 bytes in total. This turned out to be quite useful, as it allowed me to set these registers to arbitrary values.
I continued to piece things together. As outlined I started with a call to fileno.
| |
The first gadget moves the socket reference socket_stream into R0 to ensure it is passed as an argument to fileno. After the call some padding is added to properly deal with the function epilogue. The ldmia construct can be regarded as equivalent to the pop we have seen earlier. Register R5 will be used later, so I’m storing the address of dup2 there in advance.
| |
Next up are the calls to dup2. For this to work the function needs to be called three times for STDIN, STDOUT and STDERR. For all three calls, R0 should always be set to the file descriptor retrieved through fileno, while R1 starts with 0, then 1, and finally 2. The first call comes for free because R1 is set to 0 already.
| |
For the second call, I found a gadget that moves 1 into R1 before jumping to the address stored in R5, where I already have dup2.
| |
Unfortunately, I couldn’t find a feasible gadget for the third call. So, this is left as an exercise for the reader. :)
Now, all that was left to do was reuse the chain from the first simple exploit to spawn a shell.
| |
With that, it was finally time to test things out.
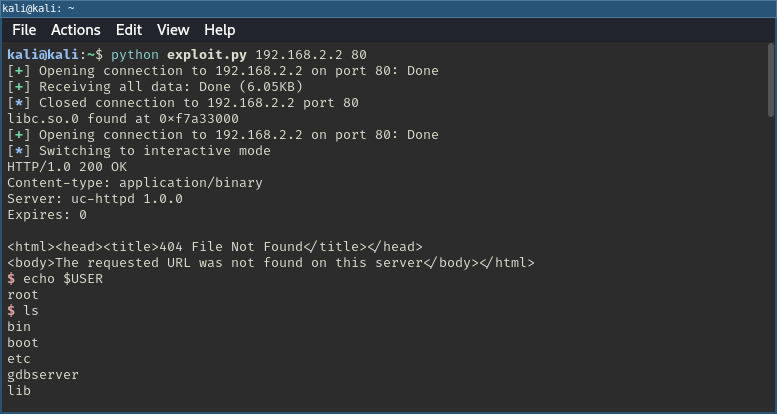
Final exploit with shell via connection reuse.
Success! A far more elegant solution than the first attempt. No need to start a telnetd server or establish a reverse shell!
The final exploit source code can be found here.
Wrapping up
As already hinted along the way, I only discovered after developing the exploit that the vulnerability discussed here had already been identified and tracked as CVE-2022-4546016. There had also already been an exploit17 out there that uses shellcode on the stack to achieve RCE. Clearly, my initial research on the product wasn’t as thorough as it should have been. Nonetheless, I had lots of fun exploring alternative ways of exploiting the vulnerability and learned a great deal in the process. Given the existence of a public exploit, we felt comfortable releasing my full exploit, even though we would typically refrain from doing so in other circumstances.
CVE-2018-10088 - https://nvd.nist.gov/vuln/detail/CVE-2018-10088 ↩︎ ↩︎
Exploit for CVE-2018-10088 - https://www.exploit-db.com/exploits/44864 ↩︎
CVE-2017-7577 - https://nvd.nist.gov/vuln/detail/CVE-2017-7577 ↩︎ ↩︎
Checksec - https://github.com/slimm609/checksec ↩︎
Arm System emulator - https://www.qemu.org/docs/master/system/target-arm.html ↩︎
GDB Static - https://github.com/guyush1/gdb-static ↩︎
Laptop Vectors by Vecteezy - https://www.vecteezy.com/free-vector/laptop ↩︎
Raspberry Pi Vector Png - https://www.raspberrylovers.com/1995/06/raspberry-pi-vector-png.html ↩︎
GEF (GDB Enhanced Features) - https://github.com/hugsy/gef ↩︎
The Thumb instruction set - https://developer.arm.com/documentation/ddi0210/c/CACBCAAE ↩︎
ARM calling convetion - https://kolegite.com/EE_library/books_and_lectures/%D0%9F%D1%80%D0%BE%D0%B3%D1%80%D0%B0%D0%BC%D0%B8%D1%80%D0%B0%D0%BD%D0%B5/Assembly/ARM_calling_convention.pdf ↩︎
ARM instructions - https://developer.arm.com/documentation/dui0379/e/arm-and-thumb-instructions/ ↩︎
Ropper - https://github.com/sashs/Ropper ↩︎
Bypass Without Space - https://github.com/swisskyrepo/PayloadsAllTheThings/blob/master/Command%20Injection/README.md#bypass-without-space ↩︎
ARM Assembly Shellcode - https://conference.hitb.org/hitbsecconf2018ams/materials/D1T3%20-%20Maria%20Markstedter%20-%20From%20Zero%20to%20ARM%20Assembly%20Bind%20Shellcode.pdf ↩︎
CVE-2022-45460 - https://nvd.nist.gov/vuln/detail/CVE-2022-45460 ↩︎
Exploit for CVE-2022-45460 - https://github.com/tothi/pwn-hisilicon-dvr/tree/master ↩︎